Showing posts with label Nails. Show all posts

Monday, 4 February 2013

Mavala nail polishes, base, top coat review!

Hi everyone,

Today I'm going to review some nail products from the brand Mavala. They are the world leader in nail care and specialise in maintaining beautiful looking nails and offer a different range of products for all nail concerns. First I'm going to show you some swatches from there mini nail polish collection:

3days ago!

This was actually apart of the woodland A/W collection in 2011, but they still sell this shade. This is such an unusual colour, it can look like a burgundy red in some lights or look like a plum/purple in others. I got alot of compliments on this one and i love the smoothness that the polishes apply!


Also another favourite is this gorgeous rose/beige/nude colour which has the finest pearl finish. This was apart of the select collection in 2011 but is still available. I think this is going to get alot of use in the spring time its such the perfect colour!


Even thought this was apart of the A/W collection in 2012, i think this is a perfect spring and summer shade. Its a gorgeous medium pink which has a reflective finish. This was formulated to deliver a distinct and opulent finish!


This polish colour was inspired by an original 1962 mavala shade, this has been created to celebrate 50 years of the mavala minis. This is the perfect bold crème red shade! For some reason its coming across quite orangy in pictures but its not at all. Also this is free from parabens and much more!

I love the packaging on these little polishes, they are actually designed so that they wont dry out before you reach the bottom which i find happens alot with other mini nail polishes. They are available in over 100 colours! I love the formulation and results of these polishes and they last much longer than others.

This is a great blue toned polish which before applying nail colour, it makes you nails look healthy, also it dries fast which makes the perfect base for your polish.


I loved wearing this top coat, it made my nails look so shiny and they dried slightly faster. Also my nail lasted up to 4-5 nails before they started chip., normally it does not last me 2-3!

Thanks much for reading, i loved these products so much, they are definitely worth trying out, bye!

Laurenlovesmakeup'xoxo

Wednesday, 23 January 2013

The Ultimate Fix by Beauty Narcotix!

Hi everyone, 

Today I'm going to review The Ultimate Fix by Beauty Narcotix. I never heard of Beauty Narcotix before because the ultimate fix is there very first product. They have 25years of experience in the beauty industry and first started developing the ultimate fix in 2008, they have been perfecting it for nearly 3 years!


The Ultimate fix is a spray in a can which claims to give you beautiful, long lasting, high shine results, that give you appearance of gel nails. There is an almost men's deodorant scent to it which is quite nice. It is recommended to spray a layer over each layer of polish you use, which includes base coat, nail colour, and top coat.
1st coat.
First I started with a base coat but did not spray a layer over that because it dries fairly quick anyway. Then I did my first layer of nail polish which was Sally Hansen complete salon manicure in Bewitched. It's one of my favourite colours for winter. As soon as I applied that I spray the ultimate fix straight over about 20cm away. I recommend not spraying it to close because I don't find the effects are as good.


You don't have to worry about it going on your skin it disappears. Once i have done the next hand its the first one is probably dry.. Then I do my second coat of nail polish and do the exact same which took a tad longer to dry, but over all it took around 2-3 minutes per layer depending on the thickness of the polish and how many layers you use. Last but not least I did a top coat which is a fast drying anyway, but I noticed once I sprayed it over top that it gave it a sparkling gleam. 


Overall I had a great experience trying this product out and even thought its a bit pricey it is totally worth it, I feel like this 200ml can would last a long while, compared to a top coat which I use up often. It took much quicker to do my nails and I didn't have to stand around a long time waiting for them to dry, also I had alot of compliments the next few days asking if I had them don't at the salon or if they were gel nails, saying how shiny they were. They definitely last longer than my regular manicure would have.


Thanks much for reading hope you have a great day, please follow it means alot, bye!:)

Laurenlovesmakeup'xoxo

Monday, 14 January 2013

Born Pretty Store nail review with 3D crystal bows!

Hi everyone!

Today im going to review and show you some more nail art pieces from Born Pretty Store. There the..

10pcs Silver Bowknot Shape 3D Crystal Acrylic UV Nail Art *

Flash
I had so much fun wearing these, i got so many compliments from them. Even though there for Acrylic nails i easily stuck these on my middle nail with a tad of glue and they stayed perfectly!

They are the perfect size to fit nails, and go pretty much with every polish. I decided to use Revlons Matte suede polish in- 507 Fire Fox.

There are 10 that come in a little pack and they are so affordable.

They are so sparkly and very eye catching like i said, alot of people noticed them!


Hope you like them, totally recommend you try them out, or go and look at some other great nail art on there site.
Also they have free worldwide 24hr shipping, and i have a 10% you can use to get money of:


Sorry if most of my post have been nail related lately, i do have some reviews on beauty products soon,Thanks for reading, bye!

Laurenlovesmakeup'xoxo

Wednesday, 9 January 2013

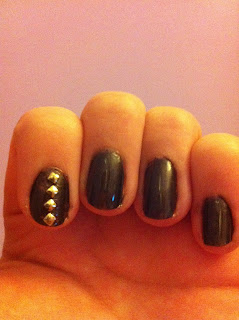
Born pretty store NOTD with square gold stud rhinestones.

Hi everyone,

Today im going to do a review/NOTD with the gold studs that i received from Born Pretty Store.


1 Bag 2mm Gold Square Stud Rhinestone Acrylic UV Gel Nail Art*

The base polish i used was 2 coats of MUA-stormy skies

As you can see, there a hundreads in a little bag.

These nail studs are great quality and fit the nails perfectly
 
They are also great for accessorising things as well as the nails like, body art, cell phone cases, glasses, cards, natural+ artificial nails.


They are easy to apply, and i feel they would last a long while.
Perfect for any size nails.
I decided to put the nail studs in a line direction down the centre of my nail with tweezers, i was going to put them across the tip of the nail aswell which i think will look super nice.
I love how edgy they make the nails look.

I hoped you like these, i have a review of some nail bows from born pretty that i will be reviewing in the next week, i recommend you check there website for awesome nail art and free shipping.

Also, Born Pretty Store gave me a 10% off code for my amazing readers, use the code below:

Thanks much, talk to you in my next post, bye!

Laurenlovesmakeup'xoxo.

Wednesday, 21 November 2012

Born Pretty magnetic nail polish review!

Hi everyone!

Today i have another nail polish tutorial/review for you today! I have been able to try out the new magnetic nail polish from born pretty store.
This has been the first time i have tried magnetic nail polish and i am loving it!

So first of all i applied a base coat, i used the Sally hansen diamond strength no chip nail colour in Flawless 1.
So apply a thick/ish layer of the polish and choose your desired magnet design that you want your nails to look like, i choosed the stripes. 

As soon as you have put the polish on hold the magnet over top why it is still dry, and you might want to be quick while doing this because they dry very quick, and once it is dry it will not work. Hold it there for 10 seconds and then you have your design. Also i would try and be steady with the magnet because i accidentally moved one of mine up and it ruined the design.

I applied 2 coats to make it opaque and then applied a top coat, but if you can live without it the don't use the top coat because i found when you are putting it over top it spreads the design so i would use quite alot and just layer it on top.

At first i did find it hard but you definitely get the hang of it and i had a lot of fun trying them out! You can also get different magnet plates for different designs from here.

The great thing about born pretty is the great affordable prices and they have gave me a 10% of all order code for you: DVL91! And if you use this code and buy something they will let me hold a giveaway for you!

Overall i loved the formulation of the polish and it reminded me of opi alot, and that's quite funny because the shape of the bottle is just like opi. They go on very smooth and i got alot of compliments from people on them. I really like how they turned out!


Thanks alot for reading i hope you liked this review, and check out there site because they have alot of interesting products, please follow for post every Wednesday+Saturday, bye!:)

Laurenlovesmakeup'xoxo

Saturday, 17 November 2012

Nail tutorial: Starry Night!

Hi everyone,

Today i  have a nail tutorial for you because i am extremely busy at the moment, but i will have some more reviews coming Wednesday and next Saturday!

So this is what i did to create this look:


Apply a base coat so the nail polishes don't stain your fingernails, i just used a clear nail polish,

Sally Hansen diamond strength no ship nail colour, in :  1 Flawless


I waited for that to dry then i applied a thin coat of the nail colour you need to make the night time, so any dark blue/black will be perfect, i used,

Nail inc. in:  Motcomb street ( In glamour magazine)


When that has dried i applied another coat to make sure that it is completely opaque:


Now the nails are dry, we are going to make the stars in the sky, now as i didn't know i was even going to do a starry night look i was just putting glitter over mine then people commented on how it looked that way. So i used a fine/sheer gold and silver glitter polish, but as the stars are white, it would probably be more effective with just silver glitter, but i still loved how mine turned out! I used:


Nail inc. in:  Glamour Glitter (In glamour magazine)

Now the next step is to use you favourite top coat, i personally use a fast drying one because I'm so impatient just sitting down waiting for them to dry, so if i move i instantly smudge them! I use:

Sally Hansen insta dri fast drying top coat


Then your all done! I hope you liked it and try and re-create this look, i think its perfect for winter months. Thanks for reading, bye!

Laurenlovesmakeup'xoxo

Saturday, 3 November 2012

Glamour magazine, free nails inc polish!

Hi everyone!

Today's post is about an amazing bargain i found out from makeupsavvy. She posted a month ago or so about GLAMOUR magazines November issue, and that it came with a free full-sized nail inc polish! I was over the moon when i fount out and soon put it in my calender so i would not forget!

The glamour magazine only cost £2 to buy and the nail inc polish is £11 alone so i decided to jump on the band wagon and get all 4 polishes that they had! Also a big plus is Cheryl is on the front of the magazine and i love her so much!

Now your probably thinking what will i do with 4 of the same magazines, well i kept one of course, and gave the others to a couple of friends and my sister!

The first polish is...

Elizabeth Street: A really girly pale-nude pink with no shimmer! I have not tried this on but i hear you have to use 3-4 coats for it to be opaque so i guess it would be a great french manicure base colour!

Glamour Glitter: A gorgeous gold and sliver glitter polish.This was the one i was most excited about my again, i heard that it is really sheer and you only get a fine layer of glitter which hardly shoes up, i hope it is not true but i might to a festive look with this a the next one to layer.

St James: A true classic red colour with no shimmer, it will be perfect for the Christmas month coming soon.

Motcomb Street: A really dark navy almost black, blue colour. I normally shy away from dark colour, the darkest i ever go is a dark purple but i cant wait to wear it this winter with a glitter over top to spice it up, even the Glamour Glitter will look so nice on it!
Elizabeth street, St james, Glamour glitter and Motcomb street.

So those are the four shades you get to choice from, it is such a bargain, i tell everyone to go out and get one right now before they go out of stock. Btw i had to go to 3 shops to get all the colour i wanted!

Thank you so much for reading i hope you liked it, i will be sure to do some NOTD or reviews with these polishes soon, please follow, bye!:)

Laurenlovesmakeup'xoxo